Highland Cow with Flowers
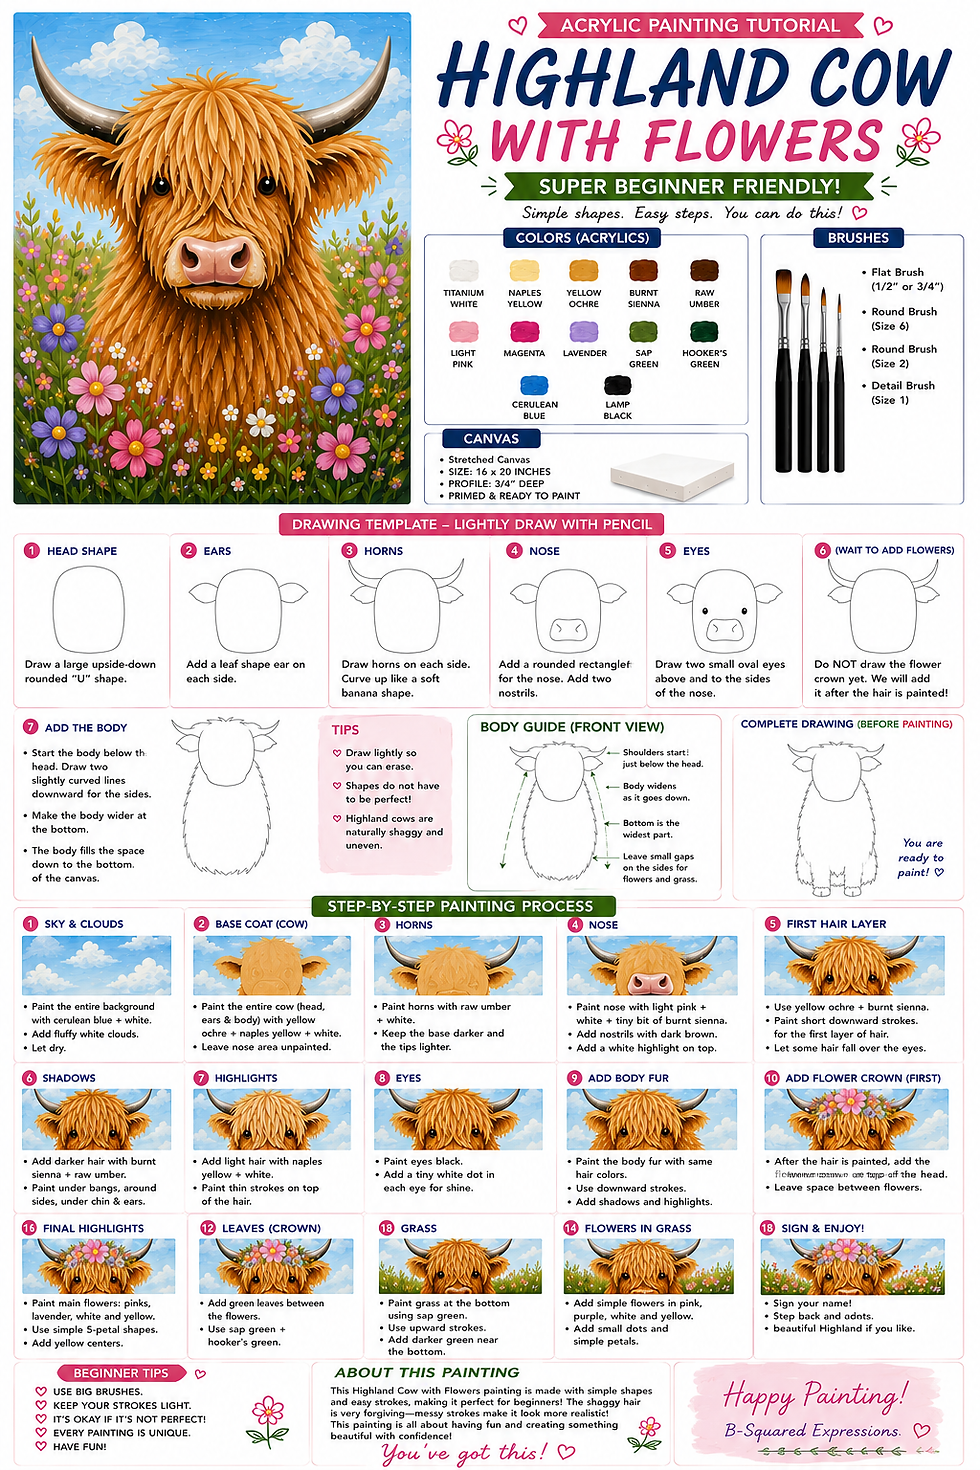
Super Beginner Acrylic Painting Tutorial
Before You Start
This painting is made from simple shapes:
one large rounded cow head
two horns
two ears
a nose shape
two eyes
lots of easy hair strokes
simple flowers and grass
Do not worry about making it perfect. Highland cows are naturally shaggy and uneven, so messy brush strokes actually help.
Supplies
Canvas
16 x 20 stretched canvas
Paint Colors
Titanium White
Cerulean Blue
Naples Yellow
Yellow Ochre
Burnt Sienna
Raw Umber
Light Pink
Magenta
Lavender
Sap Green
Hooker’s Green
Lamp Black
Brushes
1/2 inch flat brush
round brush size 6
round brush size 2
detail brush size 1
You’ll also need:
pencil
eraser
cup of water
paper towels
paper plate or palette
Step 1: Lightly Draw the Cow
Use a pencil and draw very lightly.
1. Draw the head shape
Place the cow head in the center of the canvas.
Draw a large upside-down rounded “U” shape.
Start about 3 inches from the top of the canvas.
The head should be about:
9 to 10 inches wide
11 to 12 inches tall
The bottom of the head should stop about 3 inches from the bottom of the canvas.
Do not make the head perfectly round. Make it slightly wide and fluffy.
2. Draw the ears
On each side of the head, draw a small sideways leaf shape.
The ears should sit about halfway down from the top of the head.
Make each ear about:
2 inches wide
1 inch tall
3. Draw the horns
Draw one horn coming out from each side near the top of the head.
Each horn should curve upward like a soft banana shape.
Make the horns:
wider at the base
thinner at the tip
curved upward
Do not make them too skinny at first. You can refine them with paint later.
4. Draw the nose
Near the lower middle of the face, draw a rounded rectangle or soft oval.
Make it about:
3 inches wide
1.5 inches tall
This will be the cow’s pink nose.
Add two small nostril ovals inside the nose.
5. Draw the eyes
Draw two small circles or ovals above and to the sides of the nose.
Because the cow has shaggy hair, the eyes can peek out from under the bangs.
Place them:
one on the left side of the face
one on the right side
slightly above the nose
6. Draw the flower crown
Across the top of the cow’s head, draw 5 simple circles for flowers.
Draw:
one large flower in the center
two medium flowers on each side
a few tiny circles for small filler flowers
Add leaf shapes between the flowers.
Step 2: Paint the Sky Background
Use your flat brush.
Mix:
Cerulean Blue + Titanium White
Paint the entire background around the cow.
Use gentle side-to-side strokes.
Keep the sky light and happy.
Do not paint over the cow if you can avoid it, but if you accidentally do, that’s okay. Acrylic paint can cover it later.
Add clouds
Use Titanium White with a tiny bit of blue.
Use a round brush or the corner of your flat brush.
Make clouds by tapping little fluffy shapes.
Think of clouds like groups of soft cotton balls.
Do not outline them.
Add a little light blue under the clouds for shadow.
Let the background dry.
Step 3: Paint the Basic Cow Head
Use your round brush size 6.
Mix:
Yellow Ochre + Naples Yellow + a little Titanium White
Paint the whole cow head shape.
This is just the base color.
Do not worry about hair yet.
Paint around:
nose
eyes
flowers
horns
Let it dry.
Step 4: Paint the Ears
Use the same tan mixture.
Paint both ears.
Then add a little Burnt Sienna near the bottom or inside of each ear for shadow.
The ears do not need lots of detail because hair will cover part of them.
Step 5: Paint the Horns
Use:
Raw Umber + Titanium White
Paint both horns.
Keep the base darker and the tips lighter.
While the paint is still wet, add a little white along the top edge of each horn.
This makes them look curved.
Then add a tiny bit of darker brown at the base where the horn meets the head.
Let dry.
Step 6: Paint the Nose
Mix:
Light Pink + Titanium White
tiny touch of Burnt Sienna
Paint the nose shape.
Use soft rounded strokes.
For the nostrils:
use Raw Umber + a tiny touch of black
paint two small oval nostrils
Add a little white highlight on the top of the nose.
This makes it look shiny and cute.
Step 7: Paint the First Layer of Hair
This is the most important part, but it is easy.
Use a round brush size 6.
Mix:
Yellow Ochre + Burnt Sienna
Start at the top of the head and pull short strokes downward.
Think of painting little ribbons of hair.
Do not paint straight lines all the same length.
Make some:
long
short
curved
wavy
overlapping
Paint the bangs over part of the forehead.
Let some hair come down between the eyes.
Do not cover the nose.
Step 8: Add Darker Fur Shadows
Mix:
Burnt Sienna + Raw Umber
Use a smaller round brush.
Add darker hair strokes:
under the bangs
around the sides of the face
under the chin
near the ears
below the nose
Use downward strokes.
Do not blend everything smooth.
Fur looks better when you can see the individual strokes.
Step 9: Add Light Fur Highlights
Mix:
Naples Yellow + Titanium White
Use a detail brush or small round brush.
Add lighter strokes on top of the hair.
Place highlights:
on the top of the head
across the bangs
along the cheeks
around the edges of the face
Make these strokes thin and loose.
This creates the shaggy Highland cow look.
Fur Trick
Use three layers:
medium tan base
darker brown shadows
light cream highlights
That is what creates depth.
Step 10: Paint the Eyes
Use black paint.
Paint two small oval eyes.
Let dry for a minute.
Then add one tiny white dot in each eye.
This white dot is very important because it makes the cow look sweet and alive.
If the eyes feel too big, add more hair strokes around them.
Step 11: Paint the Flower Crown
Large center flower
Use Light Pink or Magenta.
Paint a yellow circle for the center.
Then paint simple petals around it.
Petals can be:
oval shapes
teardrop shapes
little U shapes
Side flowers
Use Lavender, White, and Pink.
Keep them simple.
Every flower can be made with:
one center dot
5 or 6 petals around it
Leaves
Use Sap Green.
Paint small leaf shapes between flowers.
Add Hooker’s Green for darker leaf shadows.
Step 12: Paint the Grass
Use Sap Green.
Paint the bottom area of the canvas with loose upward strokes.
Use your brush like you are flicking grass upward.
Add darker green at the bottom.
Add lighter green at the top.
This creates depth.
Step 13: Add Flowers in the Grass
Use your detail brush.
Add tiny dots and simple flowers in:
white
pink
lavender
yellow
Do not make every flower perfect.
For beginner flowers:
dot the center
add 4 or 5 dots around it
That’s enough.
Step 14: Final Fur Touches
Look at your cow.
Add more hair strokes if needed.
Use:
dark brown where you want shadows
light cream where you want highlights
Good places for final highlights:
top of bangs
edges of ears
cheeks
chin
around the nose
Keep strokes going downward.
The cow should look fluffy, not smooth.
Step 15: Final Details
Add:
small white highlights on flowers
tiny white dots around the flower crown
extra grass blades
a few bright highlights on the cow’s hair
soft cloud touches if needed
Then step back and admire it.
Do not keep fixing too much. Beginner paintings often get overworked when we keep picking at them.
Extra Beginner Tips
Use big shapes first. Details come last.
Let layers dry before painting over them.
Do not worry if your cow is not perfectly even.
Keep your brush strokes light.
If you mess up, let it dry and paint over it.
Every Highland cow will look a little different — that’s the charm.
About This Painting
This Highland Cow with Flowers painting is sweet, cheerful, and perfect for beginners. It uses simple shapes, soft colors, and easy brush strokes to create a cute farmhouse-style painting that feels bright and happy.
The flower crown adds a fun little touch, and the shaggy hair makes the painting very forgiving. Even if your strokes are messy, they will still look like fur.
This is a great painting for anyone who has never picked up a brush before because it reminds you that art does not have to be perfect to be beautiful.


Comments