Sunny Morning Country Landscape-Full Acrylic Painting Blog Tutorial
- blstone75
- May 20
- 3 min read
There’s something peaceful about an early summer morning in the country — the soft sunlight, wildflowers moving in the breeze, and old wooden fences stretching through rolling hills. This painting is meant to capture that calm, happy feeling and turn it into something beginners can actually paint without feeling overwhelmed.
The best part about this tutorial is that it looks detailed and impressive, but it’s built using very simple layers and easy brush strokes. So even if you’re brand new to acrylic painting, you can absolutely create this piece.

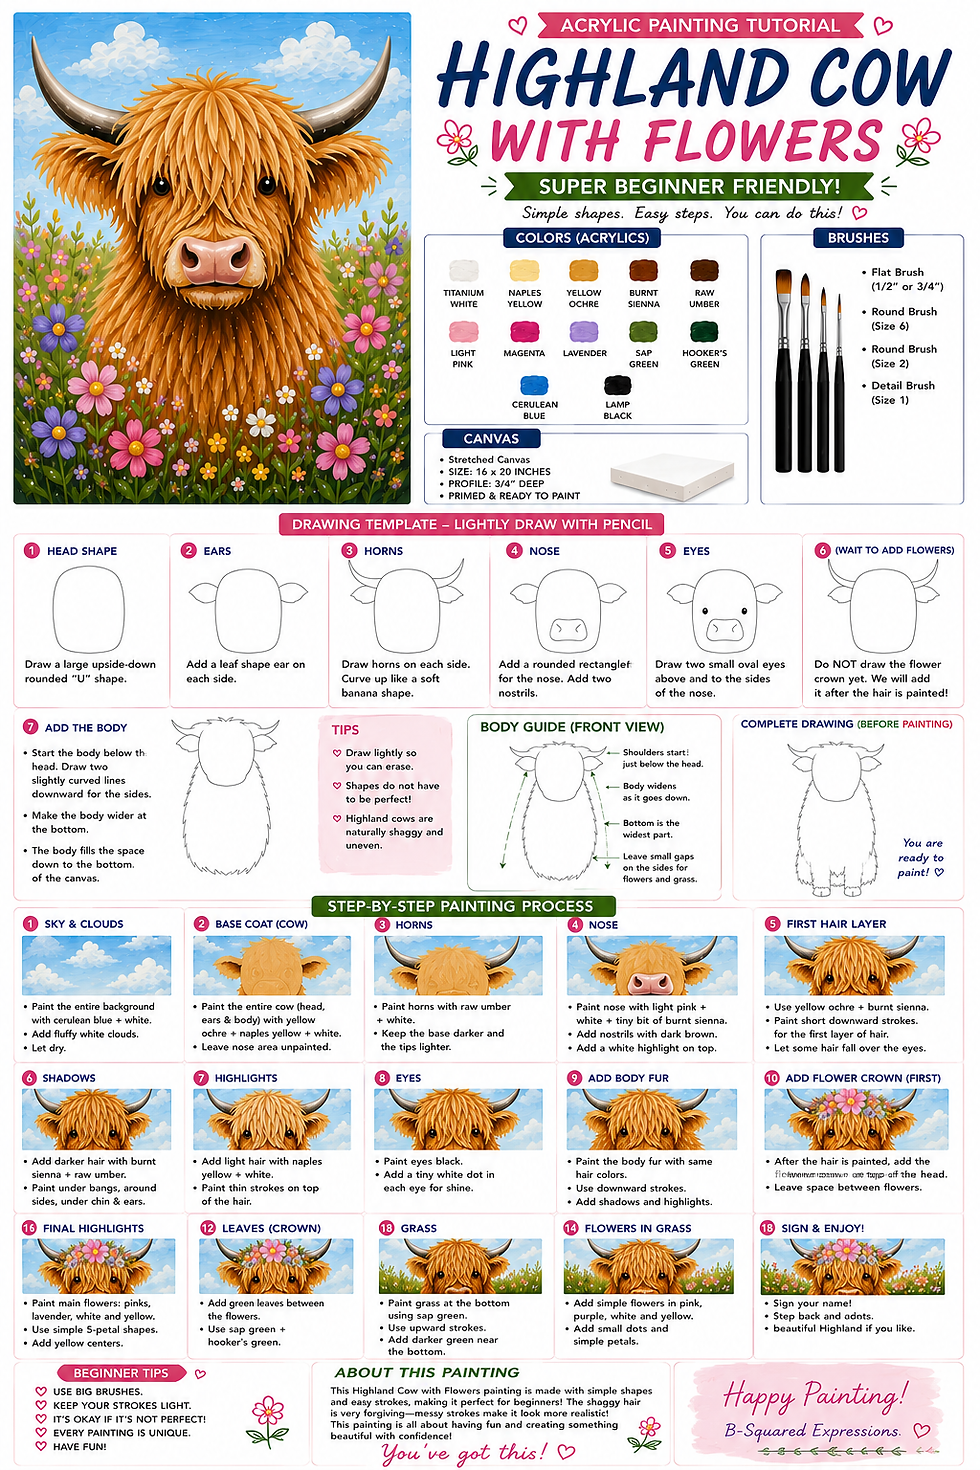
What You’ll Need:
Canvas:
16 x 20 stretched canvas
(Perfect beginner size because it gives enough room for details without feeling too tiny.)
Acrylic Paint Colors:
Titanium White
Cerulean Blue
Ultramarine Blue
Cadmium Yellow Medium
Cadmium Yellow Light
Warm Peach
Sap Green
Olive Green
Hooker’s Green
Burnt Sienna
Raw Umber
Lamp Black
Quinacridone Magenta
Brushes:
1/2" Flat Brush
Filbert Brush (Size 6)
Round Brush (Size 2 & 6)
Small Detail Brush (Size 1)
Before You Start
Acrylic paint dries quickly, which is both good and bad. It’s great because you can layer fast, but it also means blending has to happen fairly quickly.
Keep:
A cup of water nearby
A paper towel
A spray bottle if possible
(The spray bottle helps keep paint from drying too fast.)
Do not stress about making everything perfect. Nature is imperfect. The loose brush strokes actually make landscapes look more natural and beautiful.
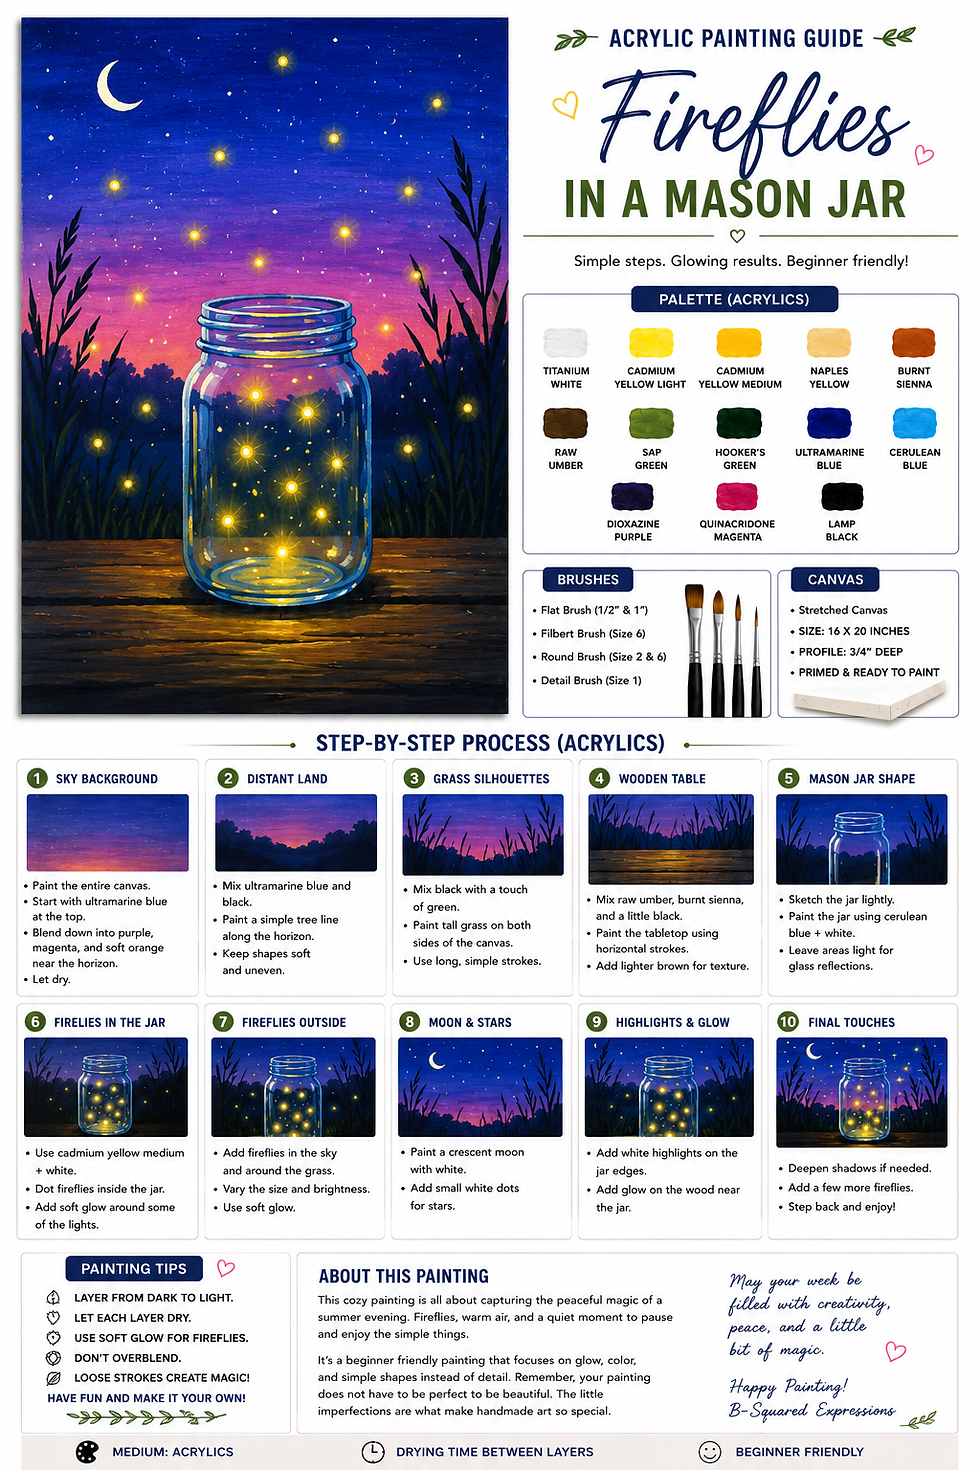
Step 1 — Painting the Sky
Start with your 1/2" flat brush.
Mix:
Cerulean Blue + Titanium White
Paint the top portion of the canvas using horizontal strokes.
As you move downward:
Add more white
Lighten the blue gradually
Near the horizon:
Blend in soft warm peach and light yellow
This creates that soft glowing morning sunlight effect.
Beginner Tip:
Do NOT overblend the colors. Let some streaks and variation remain. That soft movement makes skies look alive.
Step 2 — Adding the Sun Glow
Before the sky fully dries:
Use Titanium White mixed with a tiny touch of yellow
Create a glowing circle near the horizon
Then lightly blend outward around it using gentle circular motions.
The secret here is softness. You want glow, not a hard white dot.
Step 3 — Distant Hills
Using your filbert brush:
Mix Olive Green + White + a tiny touch of blue
Paint soft rolling hills in the distance.
Keep these hills:
Light
Misty
Less detailed
Objects farther away should always appear softer and lighter.
This instantly creates depth.
Step 4 — Midground Hills
Now begin layering brighter greens.
Mix:
Sap Green
Yellow
Tiny touch of Burnt Sienna
Use loose curved strokes to create grassy hills.
Do not paint every blade of grass. Think in shapes and texture instead.
Leave little pockets of light where sunlight would naturally hit the hills.
Step 5 — The Tree
This tree helps frame the painting and adds balance.
Start with:
Raw Umber + Burnt Sienna
Paint the trunk and branches first.
Then use a round brush to dab leaves onto the tree.
Use multiple shades:
Sap Green
Olive Green
Yellow Green
Dark Green
Layering different greens makes the tree feel full and realistic.
Easy Leaf Trick:
Instead of brushing leaves, “tap” the brush onto the canvas.
That creates natural-looking texture instantly.
Step 6 — Wooden Fence
The fence is what gives this painting its cozy country feeling.
Using Raw Umber + Burnt Sienna:
Paint vertical fence posts first
Then add horizontal rails
Do not make them perfectly straight.
Slight imperfections make wood feel real and rustic.
Once dry:
Add highlights using lighter brown + white
Add shadows using darker brown underneath rails
This creates dimension and makes the fence pop forward.
Step 7 — Wildflowers & Field
This is the FUN part.
Using small round brushes:
Dot flowers throughout the grass
Use:
White
Yellow
Pink
Lavender
Vary the flower sizes.
Some should be tiny in the distance while others are larger in the foreground.
Add loose upward grass strokes around them using different greens.
The more variation you add, the more alive the field feels.
Step 8 — Final Details
Now step back and look at your painting.
Add:
Tiny birds in the sky
Extra sunlight highlights
Darker shadows where needed
A winding path if desired
This is where the painting really comes together.
Remember: Do not overwork it.
Sometimes the best thing you can do is stop before adding too much.
Final Thoughts
This painting is all about warmth, peace, and enjoying the process. Every brush stroke does not have to be perfect for the painting to turn out beautiful.
What matters most is the feeling behind it.
Acrylic painting becomes much easier when you stop trying to paint every tiny detail and instead focus on:
Light
Color
Texture
Mood
And honestly? Those little imperfections are what make handmade art feel special.
Comments