Bluebird on a Fence Post
- blstone75
- 3 days ago
- 4 min read
🐦 Bluebird on a Fence Post
✅ Super beginner friendly
✅ Uses simple shapes
✅ Bright happy colors
✅ Country/farmhouse vibe
✅ Appeals to bird lovers
✅ Great for spring and summer
✅ Looks impressive but isn't difficult
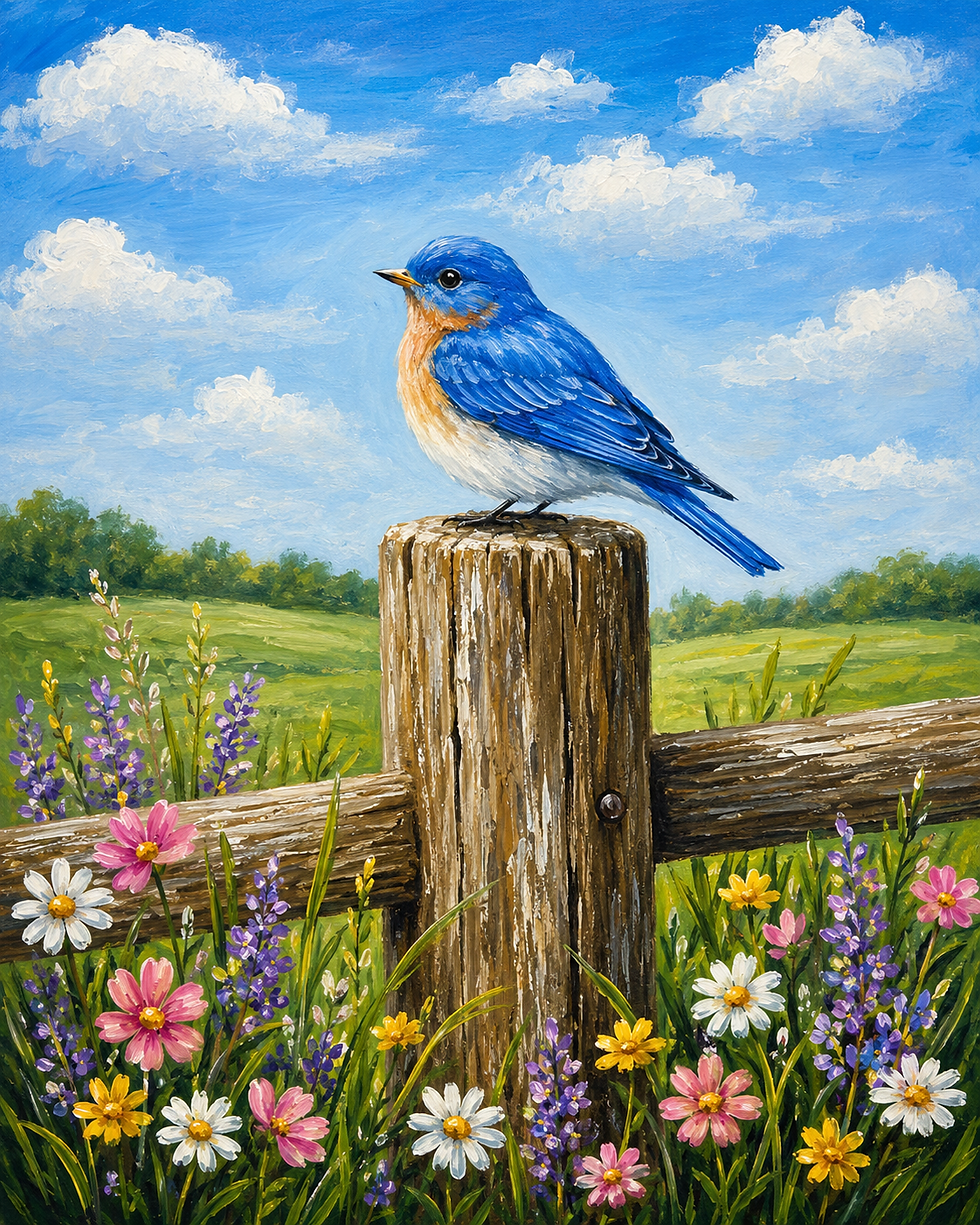
Finished Painting
Picture:
Bright blue sky
Soft fluffy clouds
Weathered wooden fence post
Cute bluebird sitting on top
Wildflowers at bottom
Green field background
Nothing complicated.
No complicated feathers.
No complicated perspective.
Just simple shapes.
Drawing Template
Step 1
Draw a vertical rectangle for fence post.
Step 2
Round top corners slightly.
Step 3
Draw an oval for bird body.
Step 4
Draw small circle for head.
Step 5
Draw triangle beak.
Step 6
Draw wing shape.
Step 7
Draw tail feathers.
Step 8
Add simple flower circles around bottom.
Painting Steps
1 Sky
Paint canvas light blue.
2 Clouds
Add fluffy white clouds.
3 Fence Post
Paint medium brown.
4 Fence Highlights
Add lighter brown streaks.
5 Bird Base
Paint bird bright blue.
6 Belly
Add light gray-white belly.
7 Wing
Add darker blue wing.
8 Eye & Beak
Tiny black eye. Orange beak.
9 Grass
Paint loose green strokes.
10 Flowers
Pink, yellow, white flowers.
11 Highlights
Add white highlights.
12 Final Touches
Extra flowers and grass.
Blog Theme
Bluebird on a Fence Post

Some people say bluebirds bring happiness, hope, and new beginnings. Whether that's true or not, it's hard not to smile when you see one sitting in the sunshine.
This week's painting captures the simple beauty of a peaceful country morning—a weathered fence post, wildflowers swaying in the breeze, and a bright bluebird stopping by for a visit.
The best part? This painting is made using simple shapes and easy brush strokes, making it perfect for beginners who are just starting their painting journey.
Sometimes the simplest things are the most beautiful. 💙
Finished Painting Description
A bright bluebird sits proudly on top of a weathered wooden fence post surrounded by wildflowers. Puffy white clouds float across a bright blue sky while soft green fields stretch into the distance.
The entire painting is built from:
circles
ovals
rectangles
simple brush strokes
No complicated drawing skills required.
Paint Colors
Sky
Cerulean Blue
Titanium White
Bird
Cerulean Blue
Ultramarine Blue
Titanium White
Fence
Raw Umber
Burnt Sienna
Titanium White
Grass & Flowers
Sap Green
Hooker's Green
Light Pink
Yellow
White
Lavender
Details
Lamp Black
Brushes
Large Flat Brush
Sky
Round Brush Size 6
Bird Grass Fence
Round Brush Size 2
Flowers
Detail Brush
Eye Highlights
Drawing Template
Step 1 — Fence Post
Draw a rectangle in the lower center of your canvas.
Make it:
3 inches wide
7 inches tall
Round the top slightly.
Think: "telephone pole without the wires."
Step 2 — Fence Rail
Draw a horizontal rectangle across the canvas.
It should connect to the fence post.
This creates a simple country fence.
Step 3 — Bird Body
Draw a medium oval sitting on top of the post.
Think: "Easter egg laying sideways."
Step 4 — Bird Head
Draw a circle attached to the body.
Make the circle slightly overlap the body.
Step 5 — Tail
Draw two pointed leaf shapes coming out the back.
Simple and easy.
Step 6 — Wing
Draw a sideways teardrop shape on the body.
Step 7 — Beak
Small triangle.
That's it.
Step 8 — Eye
Tiny circle.
Do not make it large.
Step 9 — Flowers
Draw simple circles around the bottom.
These will become:
daisies
wildflowers
filler flowers
Nothing fancy.
Painting Process
Step 1 — Sky
Use your flat brush.
Paint entire background:
Cerulean Blue
White
Blend side to side.
Keep top darker.
Bottom lighter.
Let dry.
Step 2 — Clouds
Using white paint:
Make fluffy cloud shapes.
Use:
dabbing motions
circular motions
Think cotton balls.
Leave blue showing between clouds.
Step 3 — Distant Hills
Mix:
Sap Green
White
Paint simple rolling hills.
Keep them soft.
Do not add details.
Step 4 — Fence Post Base Coat
Paint:
Raw Umber
Burnt Sienna
Cover post and rail.
Let dry.
Step 5 — Fence Texture
Add lighter brown streaks.
Pull brush downward.
This creates wood grain.
Add a few cracks using darker brown.
Super simple.
Step 6 — Bird Base Coat
Paint entire bird:
Cerulean Blue
Leave belly area unpainted.
Step 7 — Belly
Mix:
White
tiny touch blue
Paint lower belly.
Softly blend where it meets blue.
Step 8 — Wing
Paint wing:
Ultramarine Blue
Keep it darker than body.
Add a few simple feather strokes.
Step 9 — Tail
Use same dark blue.
Pull brush outward.
Only a few strokes needed.
Step 10 — Beak
Paint:
Yellow
tiny touch orange
Simple triangle.
Done.
Step 11 — Eye
Tiny black dot.
After drying:
Add tiny white dot.
Instantly brings the bird to life.
Step 12 — Grass
Use:
Sap Green
Hooker's Green
Pull brush upward.
Some tall.
Some short.
Make them uneven.
Nature isn't perfect.
Step 13 — Flowers
Daisies
White dots around yellow center.
Pink Flowers
Pink dots around yellow center.
Lavender Flowers
Purple dots around yellow center.
Keep flowers simple.
Do not paint petals individually.
Use dot technique.
Step 14 — Highlights
Add white highlights:
top of bird head
wing edge
fence post
flowers
This is where everything starts popping.
Step 15 — Final Touches
Add:
extra flowers
extra grass
cloud highlights
bird highlights
Then stop.
Seriously.
The hardest part for beginners is knowing when the painting is finished.
Painting Tips
💙 Big shapes first
💙 Details last
💙 Don't overblend
💙 Use lots of water for smoother skies
💙 Leave some brush strokes visible
💙 Have fun with it
About This Painting
Bluebirds are often seen as symbols of happiness, hope, and brighter days ahead. Whether you're painting this for your home, giving it as a gift, or simply enjoying a creative afternoon, this cheerful little bird is a reminder that beauty is often found in life's simplest moments.
This painting is designed specifically for beginners and proves that you don't need advanced skills to create something beautiful. With simple shapes, easy brush strokes, and bright cheerful colors, you'll be amazed at what you can create one step at a time.
Comments